August has a way of sneaking up on you. One moment, you're happily wearing the same bright coral manicure you got in June, and the next, you're standing in the salon, staring at a wall of nail colors, suddenly realizing your nails belong to a different version of summer. It's that beautiful in-between season when the days are still long and warm, but the light begins to change just enough to make you crave something fresh on your fingertips.
Should you hold onto those bold neon shades while the summer weather lasts, or start transitioning into the richer, moodier tones that perfectly capture the feeling of early fall? Which nail designs look modern and stylish without requiring a professional nail artist or spending hours in the salon chair? And how do you find the perfect balance between fun, playful summer nail art and a polished manicure that's suitable for work, weddings, vacations, and everything in between? These are the exact questions I find myself asking every August, and I know I'm not the only one.
That's exactly why I put together this collection of August nails ideas 2026—a carefully curated lineup of manicure designs I've genuinely been saving, admiring, and obsessing over. From beach-inspired seashell textures and cheerful lemon-print square nails to rich wine-colored almond shapes and iridescent chrome manicures that shimmer beautifully in the light, there's something here for every style, nail length, and skill level. Think of this as your ultimate late-summer manicure mood board, perfectly organized and ready to screenshot before your next nail appointment.
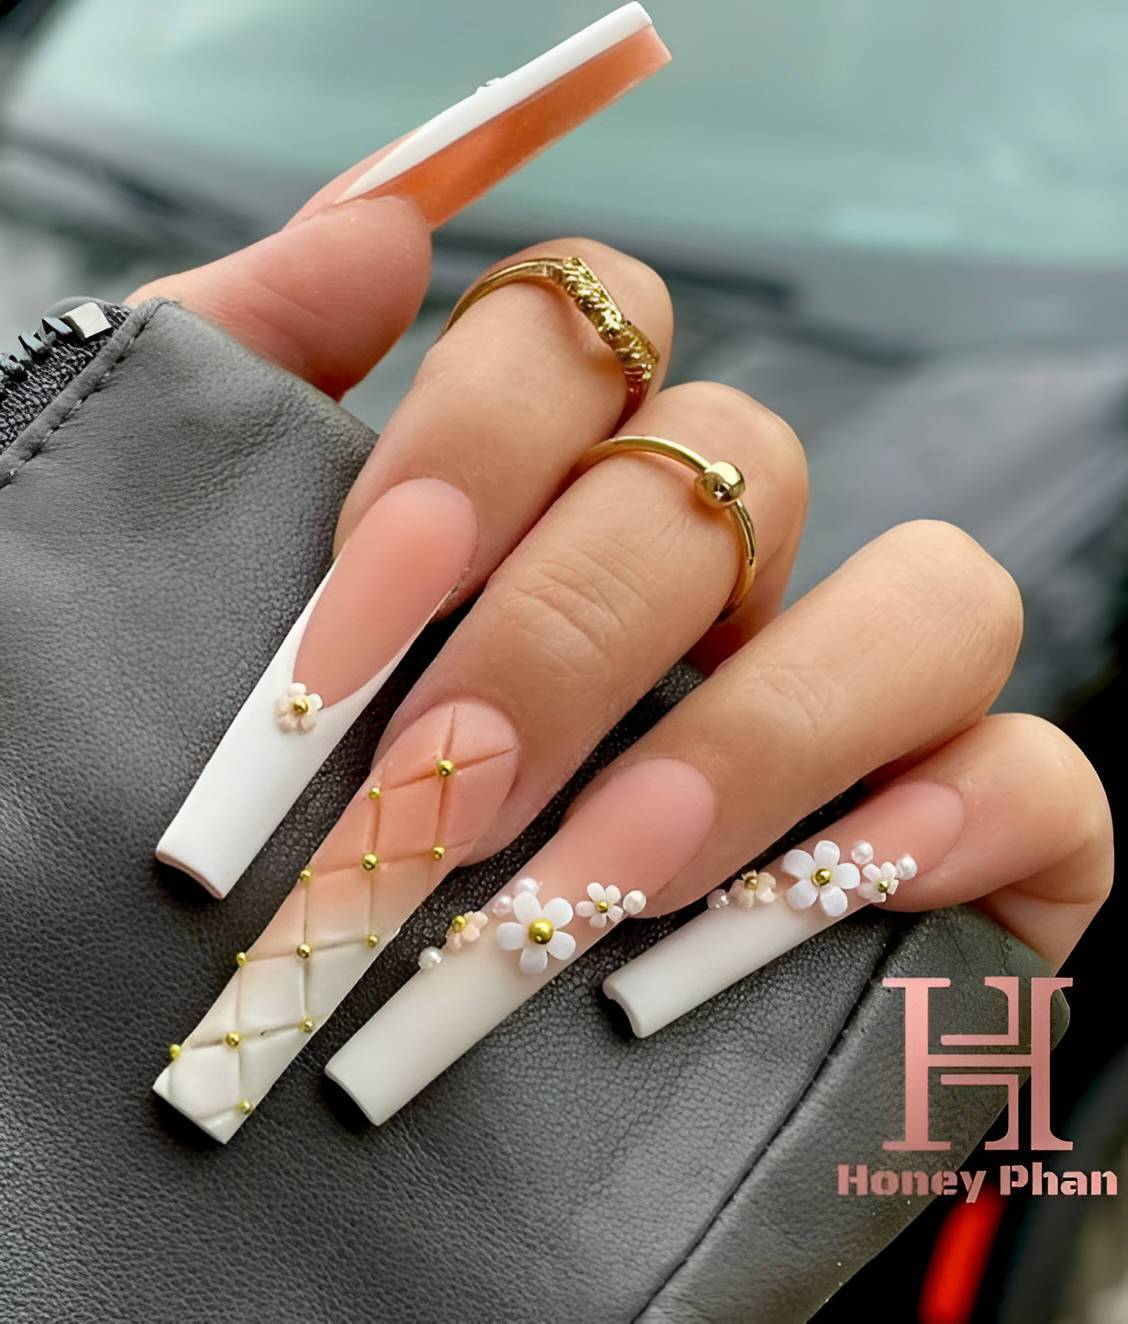
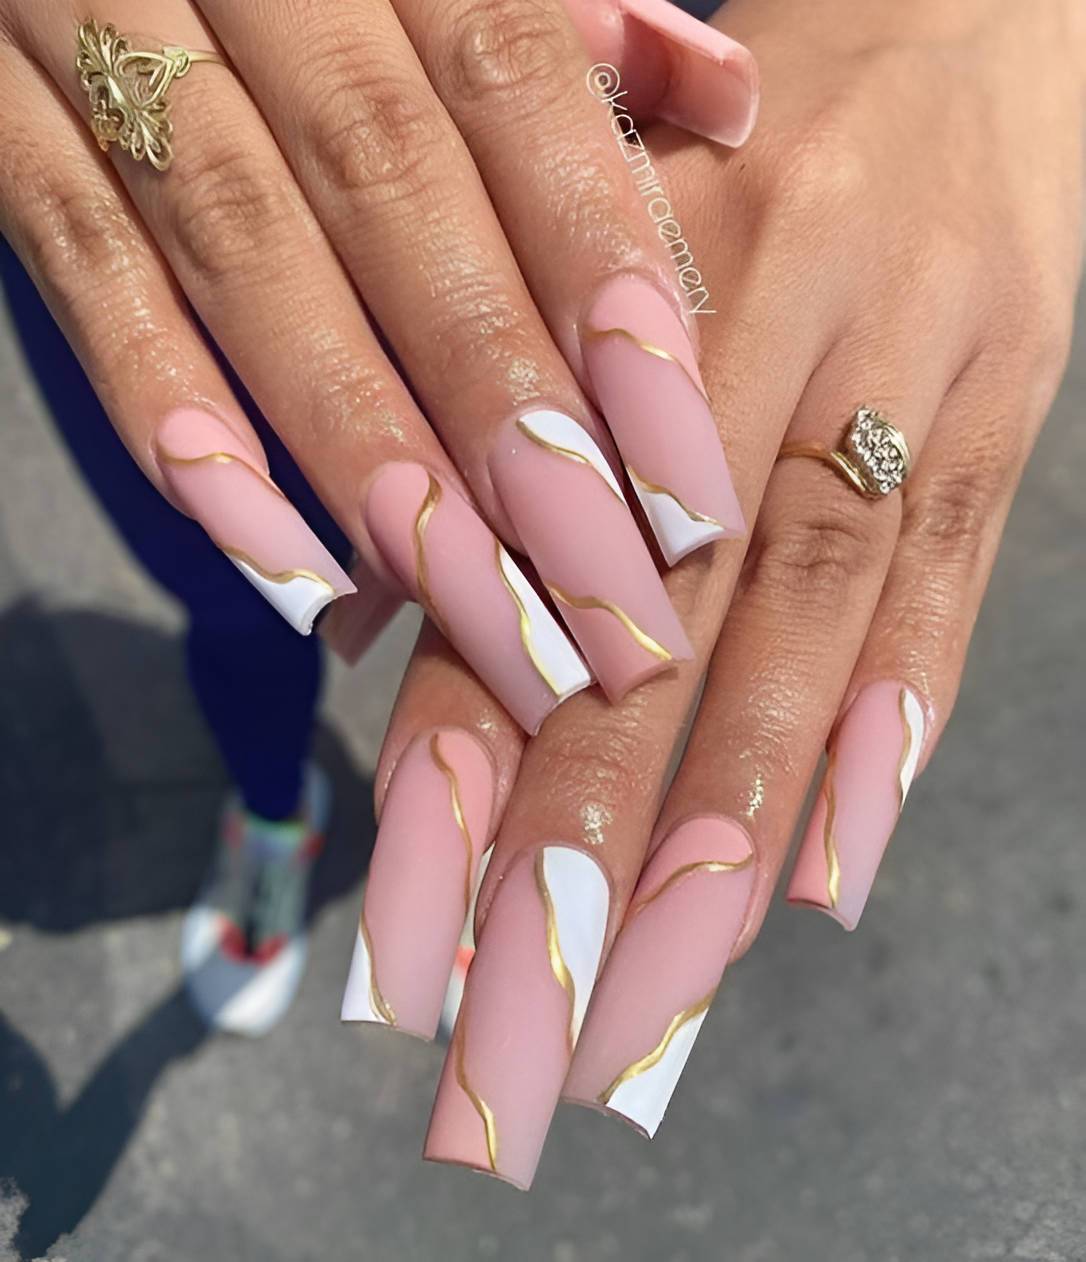
Amber Tortoiseshell Tips with Rust Floral Accents and Gold Trim
There’s a warmth to this set that feels like the golden hour of late August — when the light turns amber and everything glows. These short, slightly squared nails mix tortoiseshell French tips rimmed in delicate gold lines with accent nails featuring hand-painted rust-orange flowers that have a slightly 3D, raised quality, finished with tiny bronze or antique-gold studs scattered like freckles. The nude base is completely sheer, letting skin tone show through, which grounds the rich tortoiseshell and warm floral elements with a natural, lived-in elegance.
Photo credit: @nailartist
The tortoiseshell tips follow the blooming-gel method with amber and deep brown shades — Kokoist’s gel inks are particularly stunning for this — cured and then outlined with a thin gold line that catches light and defines the edge. For the floral accent nails, I’d use a burnt-sienna or rust-orange gel applied in thick strokes with a flat brush to create slightly raised petals, cured between each one for dimension. The tiny gold studs add a vintage, slightly bohemian quality and should be pressed into a thin layer of clear gel before a final cure and top coat. Referencing Harper’s Bazaar’s recent coverage of the tortoiseshell nail revival, this technique has become a mainstay specifically because it translates the depth of real tortoiseshell into something wearable and warm on nails.
Autumnal before autumn officially arrives — that’s the beauty of this set. It’s ideal for anyone who feels the season shift in August and wants their nails to reflect that golden, transitional energy. This ranks among my favorite August nails ideas 2026 for anyone who gravitates toward warm neutrals and artisanal details.
Reptile-Textured Mixed Almonds in Brown, Orange, and Sage
Textured, tactile, and completely unlike anything else on your feed. This set of medium-length almond nails explores a reptile-skin theme across multiple colorways — some nails feature a chocolate-brown crocodile texture, others show a burnt-orange snakeskin pattern, one pair showcases a creamy off-white alligator print, and the thumbs wear a subtle sage-green textured finish. The palette is entirely earthy — espresso, terracotta, cream, and muted green — and the textured, almost three-dimensional surface treatment gives every nail a fascinating, touchable quality.
Photo credit: @nailartist
The croc and snake textures can be achieved in a few ways: stamping plates with reptile patterns offer the quickest route, while hand-painting with a liner brush allows for more organic, realistic scales. For the chocolate-brown nails, I’d reach for DND or The GelBottle Inc.’s espresso shades, painting the crosshatch scale pattern in a slightly darker brown over the base. The burnt-orange nails use the same approach with a terracotta or burnt-sienna gel from Luxa Polish or Kokoist. The sage-green thumb nails benefit from a matte top coat to enhance the textured, natural feel, while the remaining nails can go glossy for contrast. Alternating matte and glossy finishes across a set is one of those pro tricks that adds visual interest without adding more color.
This is the manicure for the fashion-forward woman who sees her nails as an extension of her wardrobe — someone who owns great leather boots and isn’t afraid of an earthy, editorial aesthetic. It’s one of the most unique August nails ideas 2026 in this collection and would pair beautifully with fall’s first warm-toned outfits. Bold, textural, and quietly unforgettable.
Bright Tangerine and Swirl-Art Nails with a Modern French Twist
If there’s one color that screams “August and I’m not done with summer yet,” it’s tangerine orange. This set uses medium-length square nails and mixes a single bold, opaque tangerine statement nail with softer, more abstract accent nails — some feature flowing red-and-orange abstract swirl art over a sheer pink base, while others wear a barely-there peach or white French tip that’s so subtle it almost whispers. The contrast between the loud, confident orange nail and the delicate surrounding designs creates a set that feels both energized and elegant.
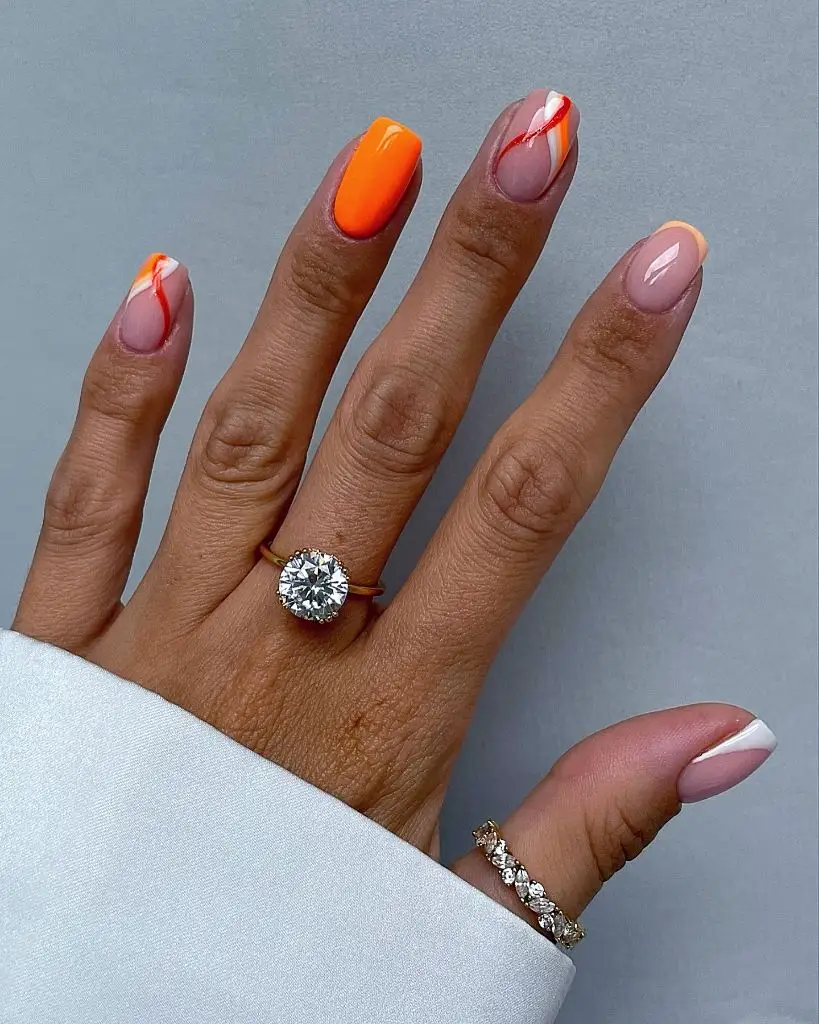
Photo credit: @nailartist
For that punchy tangerine, I’d go with OPI’s “Pants on Fire!” or a vivid neon orange from Beetles — neon shades often require a white base coat underneath for maximum vibrancy, which is a trick I always use. The swirl-art nails are created freehand using a thin liner brush and a combination of warm red, orange, and white gels; work in flowing, organic lines and cure between colors to keep them separate and crisp. The French tips can be painted in soft peach or barely-there white using a guide sticker or freehand with a steady brush. What makes this mixed set work so well is the proportion: only one nail per hand carries the full-impact solid color, while the rest offer quieter variations on the same warm theme.
This is the manicure that says “I’m savoring every last bit of summer.” It’s ideal for rooftop dinners, beach getaways, and anyone who loves simple summer acrylic nail designs with a creative twist. If your August nails ideas for 2026 involve holding onto warm-weather energy for as long as possible, this tangerine set is your answer.
Abstract Multi-Color French Tips with a Playful Yin-Yang Vibe
I completely understand why abstract French tips have become a phenomenon — they offer the polished structure of a classic French manicure with room for genuine creative expression. This almond-shaped set keeps the base a clean, sheer blush pink, then paints each nail’s French tip in a different abstract color combination: one tip splits between deep burgundy and soft blue with small dots, another pairs navy and pale yellow, and each nail offers its own mini color story. Small dot accents in contrasting colors add a yin-yang-inspired playfulness that keeps the overall vibe lighthearted.
Photo credit: @nailartist
The sheer pink base is the anchor — something like CND Shellac’s “Clearly Pink” or a BIAB in a natural pink tone. For the abstract tips, use a thin liner brush to carve out the French tip shape, then divide it into organic sections painted in different colors: deep burgundy, cobalt, cream, baby blue, chocolate brown. The tiny dots — one per tip in a contrasting shade — are added with a small dotting tool and cured last. Each nail takes only a few minutes once you’re comfortable with the technique, and the beauty is that minor asymmetry in the abstract shapes actually enhances the design. I’d suggest choosing your palette in advance — four to five shades that work tonally — and rotating them across all ten nails.
Effortless, artistic, and quietly confident. This design works beautifully for everyday wear because the sheer base keeps it professional while the colorful tips add personality. It’s one of the most versatile August nails ideas 2026 I’ve featured — dress it up for dinner or down for the office, and it looks equally at home.
Pearlescent Seashell Nails with Sunny Yellow French Tips
There’s something undeniably romantic about nails that look like they washed ashore — soft, luminous, and a little bit magical. This set pairs an elegant almond shape with a milky, pearlescent base that has that coveted glazed-donut glow, then layers in 3D sculpted seashell details on select accent nails, each crowned with a tiny pearl at the crest. The remaining nails feature clean yellow French tips in a warm, buttery lemon shade that feels distinctly August — sunny without being overwhelming. As far as summer-to-fall bridge nail designs go, this one captures the tail end of coastal energy while still feeling refined enough for a late-summer wedding.
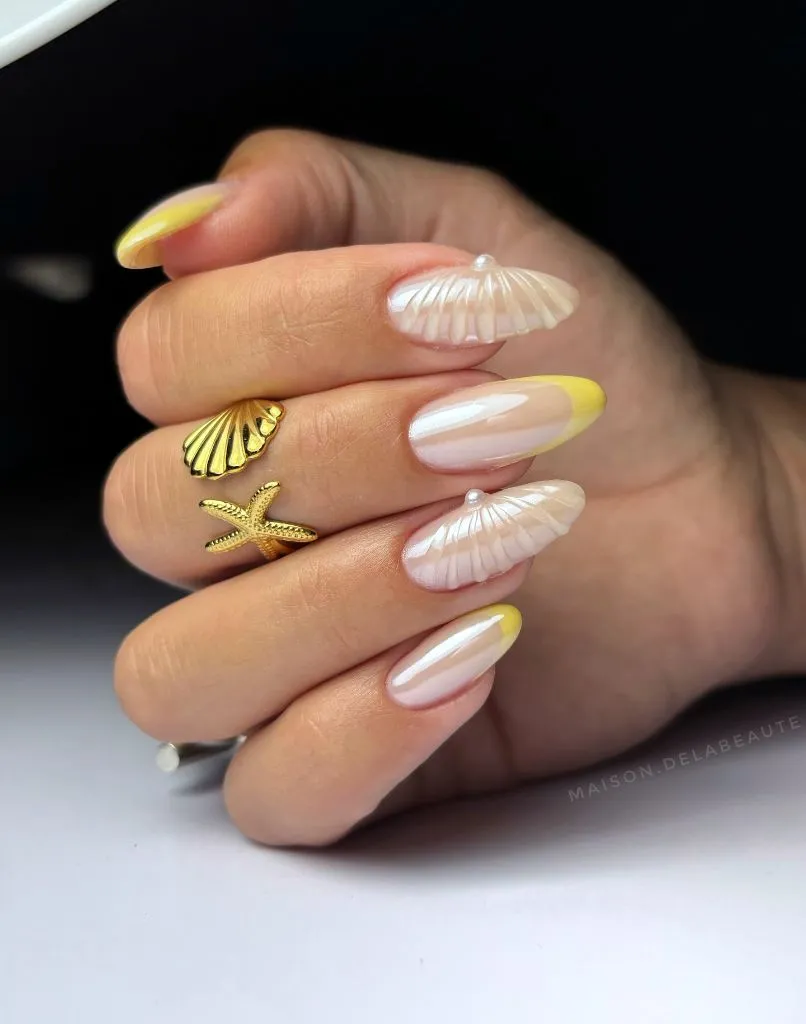
Photo credit: @maison.delabeaute
I’d recreate the pearlescent base using a sheer milky pink from The GelBottle Inc. or CND Shellac’s nude range, finished with a white chrome or pearl powder buffed over the tacky layer for that soft, reflective glow. The 3D seashells are sculpted with builder gel or a thick sculpting gel — Kokoist and Apres both offer excellent options for this kind of dimensional work. For the yellow tips, a warm butter shade from OPI GelColor or Beetles gel polish gives a smooth, opaque line in two coats, and I always find that using guide tape or a thin striping brush to define the smile line first keeps the French tip crisp. The balance here — minimalist on most nails, textured on just two — is exactly the kind of proportion that Tom Bachik often highlights when discussing how to make statement accents feel intentional rather than cluttered.
This is the manicure for anyone who wants to hold onto beach-vacation energy just a little longer. It’s equally at home at a seaside dinner, a Sunday brunch, or a casual Friday at the office, and the pearlescent finish photographs beautifully in natural light. If you love August nails ideas 2026 that feel luxurious without being over the top, save this one immediately.
Lemon-Print Square Nails with Baby Blue Polka Dots and Stripes
Cheerful doesn’t even begin to cover it. This square-shaped set is a full-on summer mood board on your fingertips, mixing buttery lemon-yellow accent nails — one covered in sky-blue polka dots, another striped with clean light-blue lines — alongside soft pink bases with delicate yellow French tips. The pièce de résistance is the adorable lemon-slice ring worn alongside, but even without the accessory, these nails scream iced lemonade on a hot porch. If you’ve been looking for cute summer nails that fully commit to the fruit-inspired trend, this set goes all in with confidence.
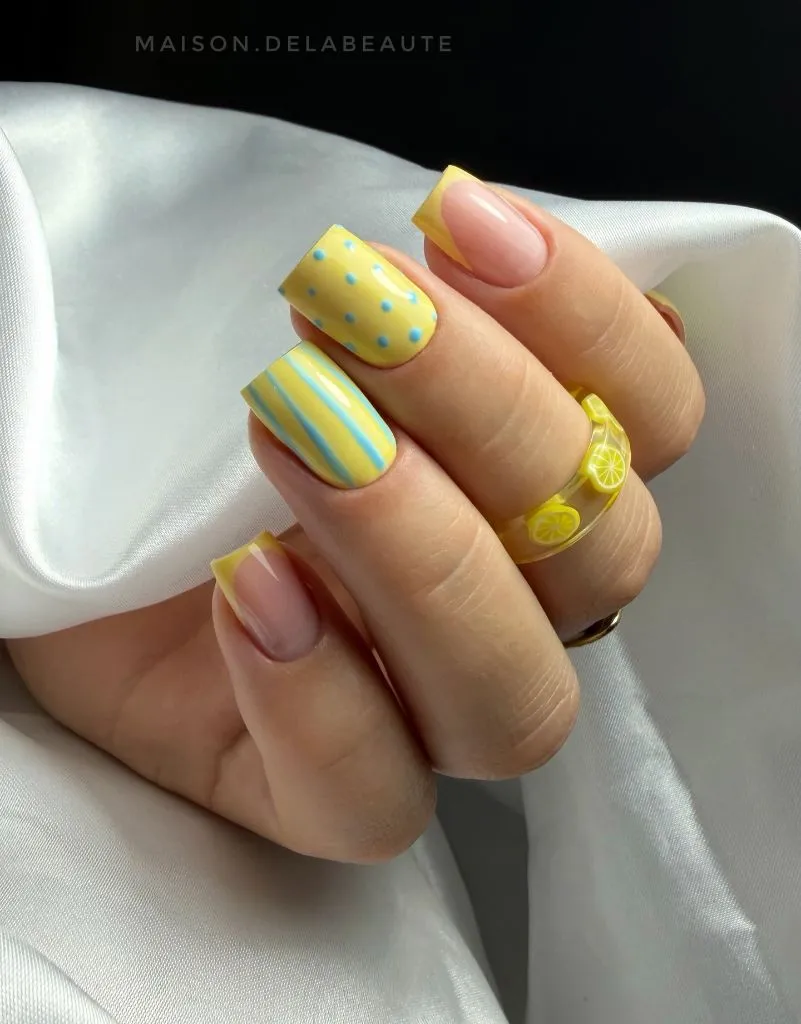
Photo credit: @maison.delabeaute
A lemon-yellow cream polish — something like OPI’s “Stay Out All Bright” or a similar shade from Beetles — gives you that perfect opaque, sunny base for the patterned nails. The blue dots and stripes are best achieved with a fine dotting tool and a thin liner brush using a soft baby-blue gel; Luxa Polish and Born Pretty both carry gorgeous pastel blues that work beautifully against yellow. For the French tips, thin layers are everything — outline the smile line with a striping brush first, fill carefully, and cure before adding any embellishments. The genius of this design is how the mix-and-match nails create visual variety while the consistent yellow-and-blue palette keeps everything cohesive.
I’d happily wear this to a farmers’ market, a pool party, or honestly just to make myself smile on a regular Tuesday. It’s a playful, summer fruits nail art set that works best on short to medium square nails and translates perfectly into a DIY-at-home project if you’re patient with the details. For anyone who believes August should taste like lemonade and look just as bright, this is your manicure.
Red and Leopard-Print Almonds with Pearl Bow Accents
Bold, feminine, and a little bit rebellious — that’s the energy radiating from this mixed manicure. The almond-shaped nails alternate between high-gloss cherry-red solids and sheer pink bases topped with leopard-print French tips in black and warm brown, and some of the accent nails feature delicate white bows made from tiny rhinestones or pearl dots arranged in a crisscross pattern. The combination of classic red with animal print feels equal parts retro glamour and modern edge, and the bow details add an unexpected sweetness that keeps it from feeling too aggressive. This is one of those August nails ideas 2026 that works for women who love a bold summer red nail but want to push it further.
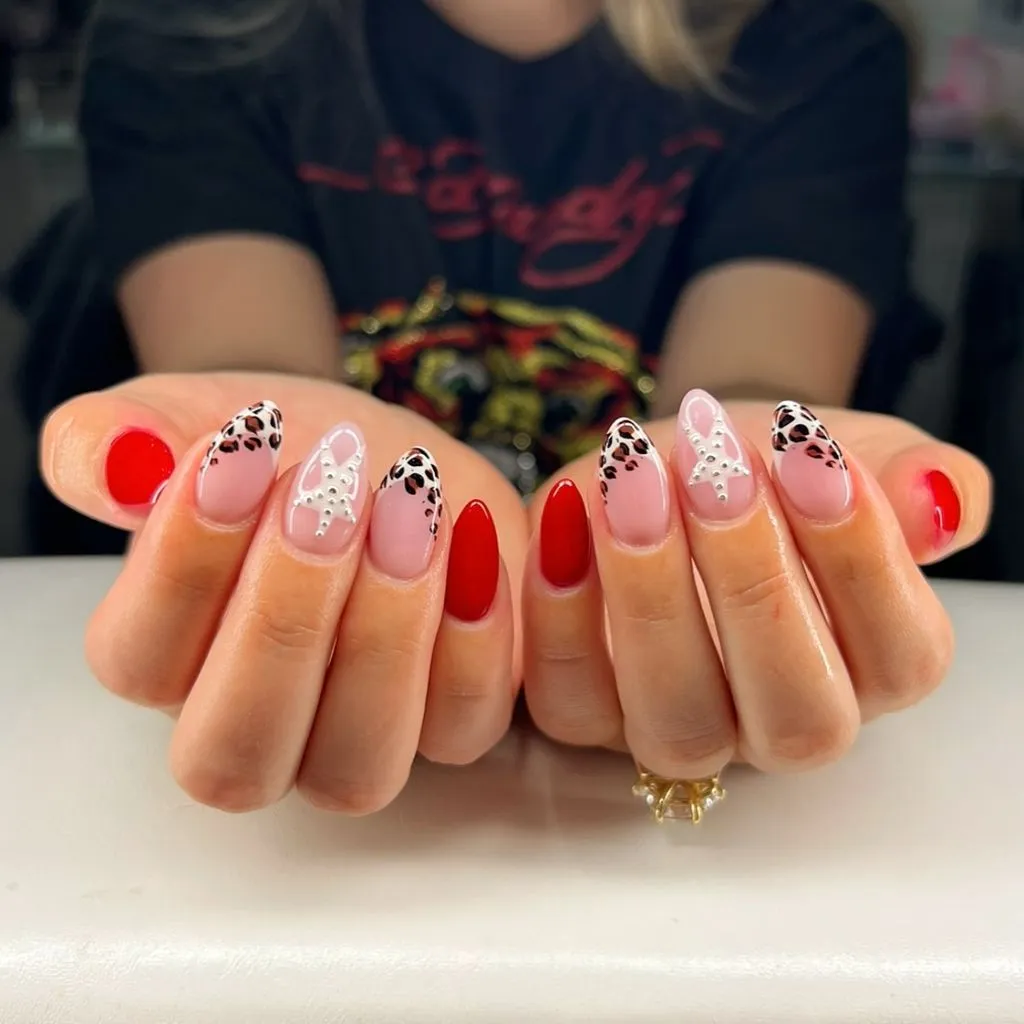
Photo credit: @nailartist
For the red nails, I’d reach for OPI GelColor in “Big Apple Red” or CND Shellac’s “Wildfire” — both are those legendary, looks-expensive reds that lay down perfectly in two coats. The leopard print tips require a thin detail brush and a steady hand: start with a warm brown or caramel base for the French tip area, then add irregular spots in espresso brown and outline a few in black for depth. The pearl bow accents can be created with tiny flat-back pearls and a dot of clear gel for adhesion, or use nail charms from Daily Charme for a quicker salon finish. As Betina Goldstein has mentioned in interviews with Allure, mixing one bold pattern with a classic solid color is the safest way to create a mixed set that looks curated rather than chaotic.
Confident, date-night-ready, and impossible to ignore. This set suits anyone who gravitates toward statement manicures that balance edge with elegance — think cocktail bars, rooftop dinners, or any evening where you want your hands to do the talking. It also translates beautifully to a shorter length if stilettos or long almonds aren’t your thing.
Safari-Inspired Mixed Prints with Forest Green and Tortoiseshell
Every nail tells a different story here, and somehow they all read like chapters of the same adventure. This medium-length oval set is a masterclass in mixed-print nail art, featuring deep forest-green nails with a subtle crocodile-skin texture, tortoiseshell accent nails rimmed in fine gold lines, black-and-white zebra-stripe French tips, a nude base nail with tiny gold studs, and even a snakeskin-patterned pinky in tan and cream. The earthy palette — olive, amber, espresso, ivory, and warm gold — ties everything together with a richness that feels distinctly late-summer, like the last warm weekend before the leaves start turning.
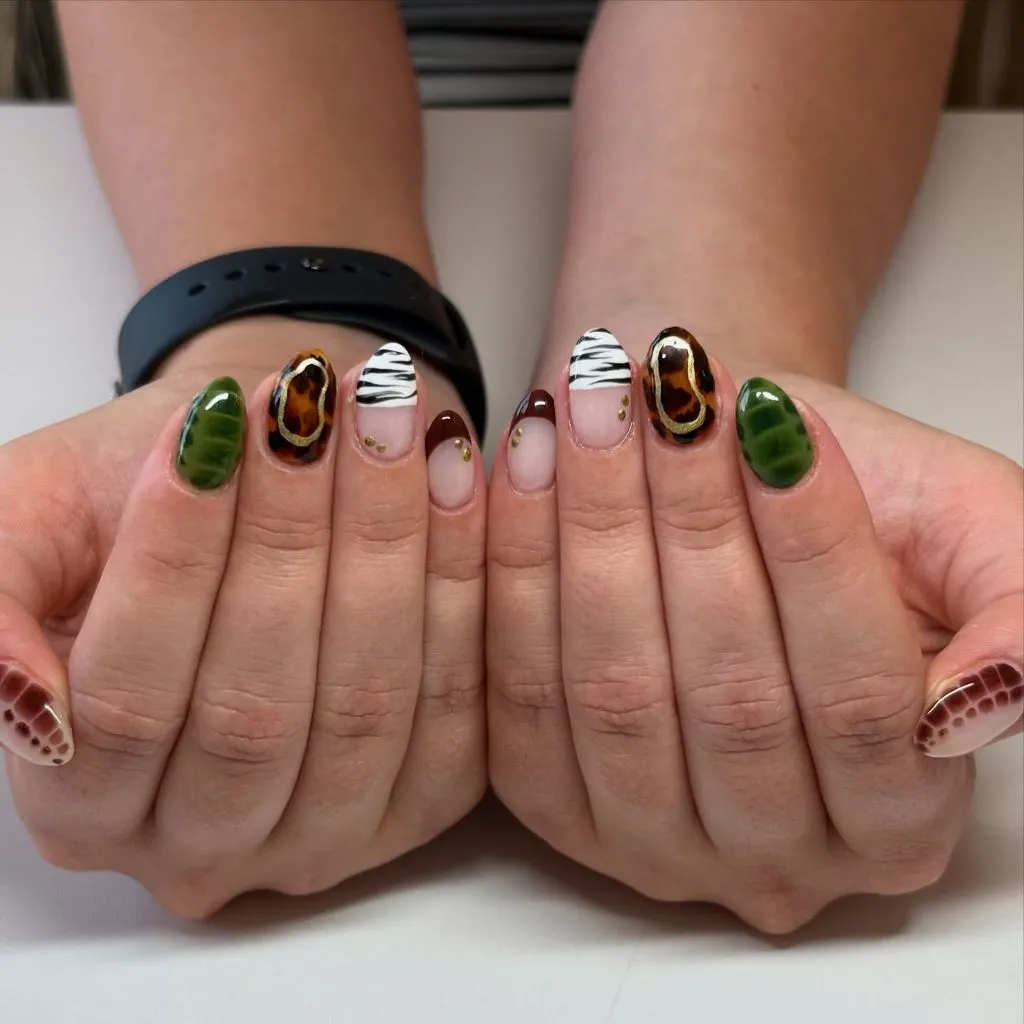
Photo credit: @nailartist
Recreating this requires some patience but rewards you enormously. For the tortoiseshell nails, blooming gel is your best friend — apply a clear or amber base, drop in spots of espresso and burnt sienna gel, let them spread naturally, then outline with a gold liner gel from Kokoist or a fine brush dipped in metallic gold. The crocodile texture on the green nails can be achieved with a stamping plate or by carefully hand-painting a crosshatch pattern with a slightly darker green over a forest-green base from DND or The GelBottle Inc. The zebra tips are straightforward with a liner brush and black gel over white. I’ve found that curing each individual print nail fully before moving to the next prevents smudging and keeps the details sharp.
This is the manicure for the woman whose aesthetic lives somewhere between earthy bohemian and polished maximalist. It’s editorial enough to stop someone mid-conversation at a dinner party, yet the neutral-toned palette keeps it wearable for everyday life. Among all the August nails ideas 2026 I’ve curated, this one has the most personality per square centimeter.
Patriotic Stars and Stripes in Cobalt Blue and Cherry Red
Late July bleeds right into August, and if you’re not quite ready to retire your patriotic spirit, this set lets you carry it forward with real style. The oval-shaped nails split the design between both hands — the left features solid cobalt-blue nails alongside a milky-white accent nail with soft blue stripes and scattered blue stars, while the right hand mirrors the layout in cherry red with pink-and-white stripes and red stars. The result is a stars-and-stripes manicure that feels genuinely fun rather than costume-y, with rich, high-gloss finishes that make the colors pop.

Photo credit: @nailartist
A saturated cobalt blue like OPI’s “Do You Sea What I Sea?” or CND Shellac’s “Blue Eyeshadow” gives you that deep, confident blue, while a true cherry red — think OPI “Cajun Shrimp” or Beetles’ classic red gel — handles the warm side of the set. The stars are most easily applied with a nail stamping plate, though if you’re handy with a fine liner brush, freehanding them gives a charmingly imperfect look that I personally love. The striped accent nails benefit from striping tape laid down before painting the contrasting color, then peeled away while the polish is still wet for crisp, clean lines. This is one of those colorful summer nail designs where the technique is actually simpler than the result suggests.
Perfect for backyard barbecues, beach weekends, or any early August celebration where you want to feel festive without being literal. I especially love how each hand has its own color identity — it’s a creative choice that keeps the design from feeling too matchy-matchy. If you’re after a spirited, feel-good set that still qualifies as wearable nail art, screenshot this one.
Warm Amber Abstract Swirls on Square Nails
Sunset in a manicure — that’s the first thing I thought when I saw this design. These medium-length square nails are covered in a swirling, abstract pattern that blends sheer peachy pink, warm amber, caramel gold, and soft terracotta, with white curving lines and gold foil accents layered throughout. The effect is organic, almost painterly, like someone captured the colors of an August sky at golden hour and pressed them onto each nail. Every nail carries the same warm palette but with slightly different compositions, creating a curated set that feels artistic without being identical.
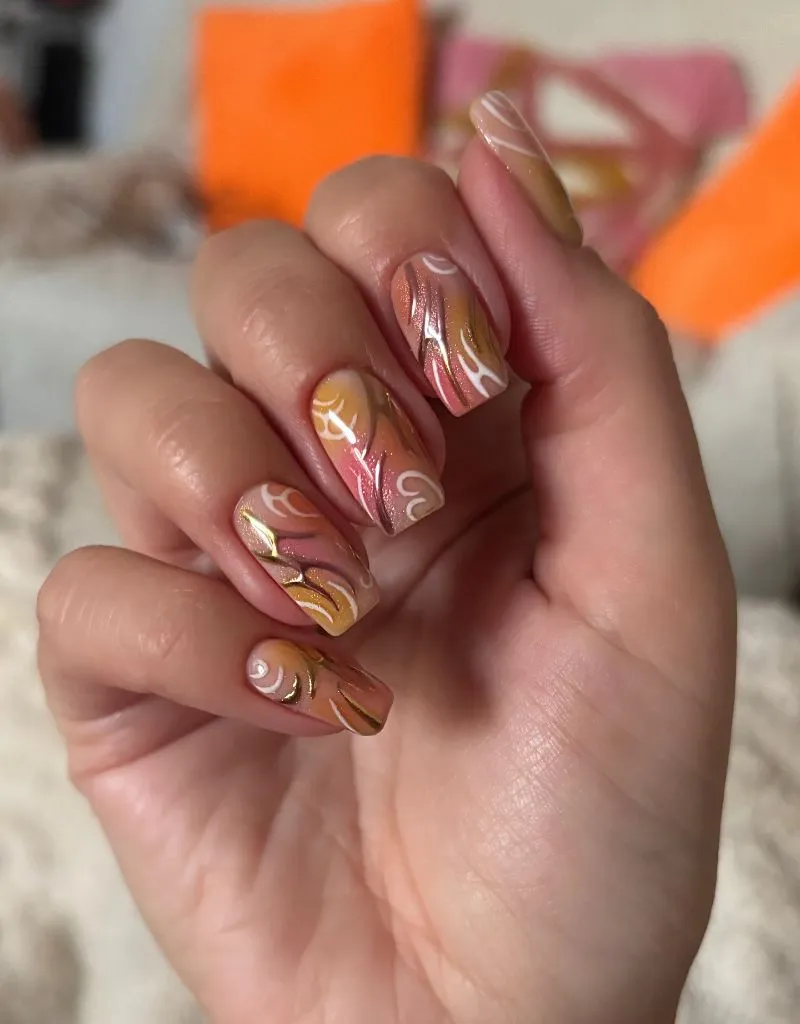
Photo credit: @nailartist
The base here starts with a sheer nude or soft peach gel, and the color story builds from there using a blooming gel technique or freehand watercolor-style application. I’d use warm-toned gels from Kokoist or The GelBottle Inc. — their amber, caramel, and terracotta shades blend beautifully — then add the white swirl lines with a liner gel and a thin detailing brush, working slowly and curing between each layer. A touch of gold foil or chrome flakes pressed into uncured gel adds that molten, luminous quality that elevates the whole design. If you’ve never tried abstract nail art before, this forgiving style is actually one of the most beginner-friendly approaches because the organic shapes mean there’s no “wrong” line.
For me, this is one of those manicures that feels like wearing jewelry. It’s warm, personal, and endlessly interesting to look at. The earthy-luxe palette transitions effortlessly from late-summer evenings into early September, making it a smart choice for anyone searching for August nails ideas 2026 that don’t have an expiration date.
Stained Glass Nails with Gold Outlines and Gemstone Accents
Honestly, this might be the most artistically ambitious set in this entire collection — and it delivers. Every almond-shaped nail features abstract, organic shapes outlined in thick gold lines, filled with translucent washes of pastel pink, sage green, soft lavender, and milky white, then punctuated with small rhinestones and crystal gems in pink, turquoise, green, and iridescent finishes. The effect is unmistakably stained glass, like a tiny cathedral window on each fingertip, with the gold borders giving the whole design structure and luxury.
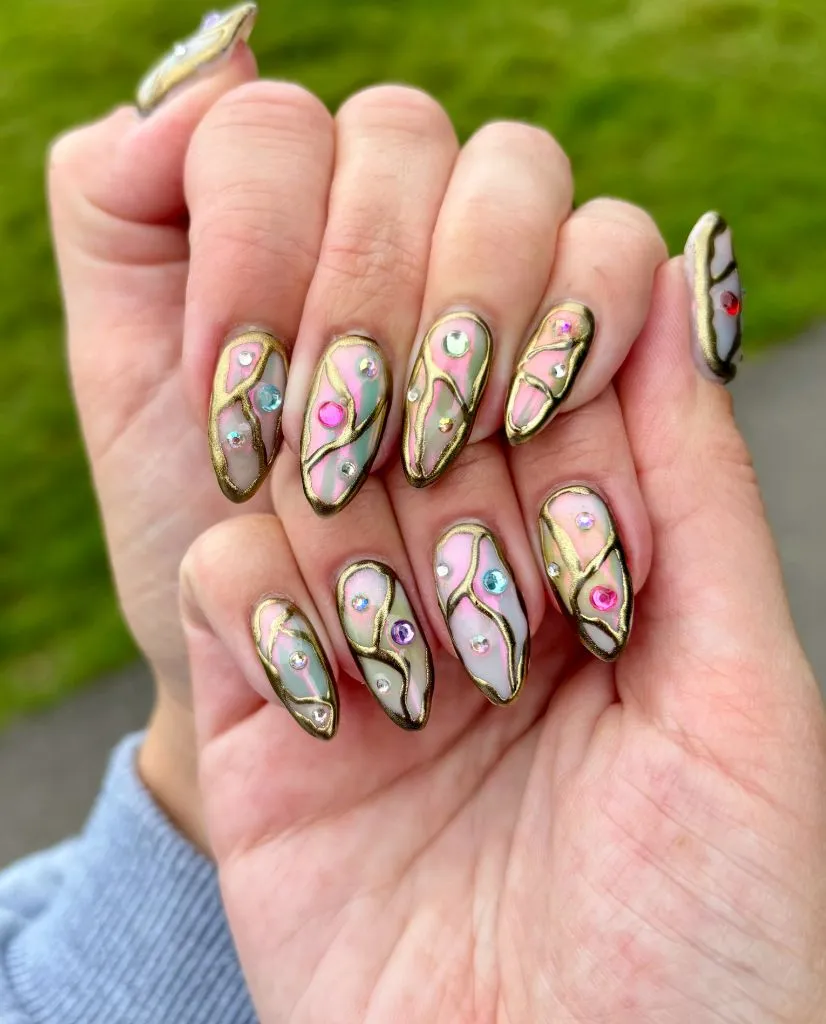
Photo credit: @nailartist
The gold outlines are best achieved with a metallic gold liner gel — Kokoist’s Art Line series is legendary for this — applied with a fine liner brush in confident, flowing strokes. Cure the outlines first, then fill in the sections with sheer or jelly-toned gels to maintain that translucent, light-catching quality; opaque colors would lose the stained-glass illusion entirely. The gems are adhered with a tiny bead of builder gel and cured individually, then sealed under a glossy top coat. A design this detailed is best done in the salon by a nail artist who specializes in hand-painted work, but the color palette is so forgiving that even slightly imperfect lines add to the artisanal feel.
This is a true statement manicure — the kind of set that strangers will stop you to compliment. It’s perfect for vacations, special events, or any moment when you want your nails to feel like wearable art. If you’ve been searching for August nails ideas 2026 with gel that push the boundaries of what nail art can be, this stained-glass set is the answer.
Cornflower Blue Glossy Almonds — The Easiest Summer Statement
Sometimes the simplest manicure ends up looking the most luxurious, and this cornflower blue set proves that rule beautifully. Every nail is a softly rounded almond shape at a natural, comfortable medium length, painted in a creamy, high-gloss cornflower blue that sits right between periwinkle and true sky blue. There’s no nail art, no accents, no embellishments — just a perfectly applied, flawlessly smooth color that lets the shade itself do all the talking. The finish is so glossy it looks almost wet, like fresh rain on a summer morning.
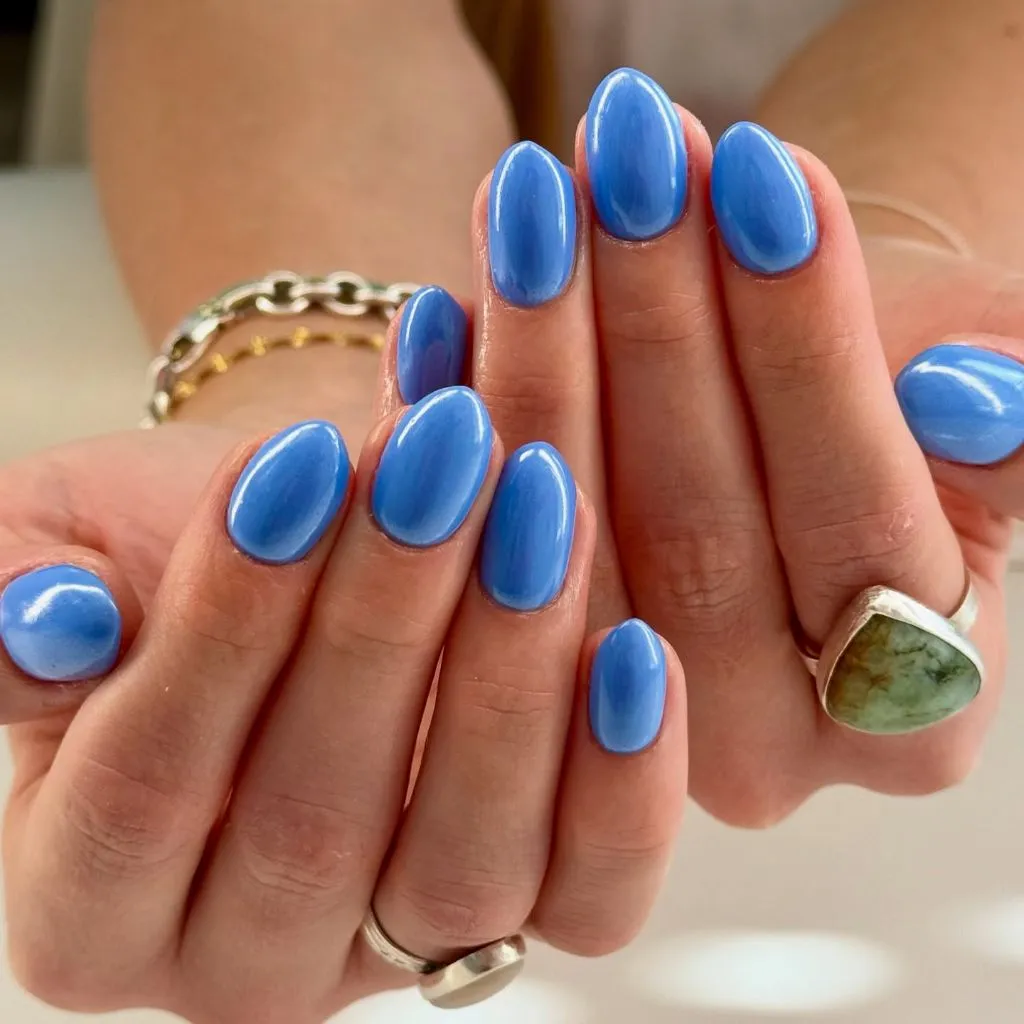
Photo credit: @nailartist
Getting this level of glass-like smoothness comes down to technique. Start with a strengthening base coat or BIAB to create an even canvas, apply two thin, even coats of your blue — DND’s “Blue Earth” or OPI GelColor’s “Can’t CTRL Me” are both in this gorgeous cornflower family — and finish with a no-wipe glossy top coat for maximum shine. I always find that floating the top coat in one smooth, slightly thick layer and avoiding brush marks is what separates a good solid mani from a salon-quality one. Brands like CND Shellac are particularly excellent for this kind of single-color perfection because their self-leveling formulas minimize any streaking.
This is the August nail for the woman who wants to look polished without fuss. It works for absolutely everything — the office, brunch, beach trips, date nights — and the color feels inherently summery while also sliding gracefully into September. If you want an easy, elegant August nails idea for 2026 that you can genuinely DIY at home in under an hour, this is it.
Holographic Periwinkle Chrome Almonds with an Iridescent Glow
I keep saving looks like this and I’m not even slightly sorry. These medium-to-long almond nails are coated in a light periwinkle-blue chrome that shifts between icy blue, soft lilac, pale green, and a whisper of pink depending on the angle and the light. The holographic finish is otherworldly — equal parts futuristic and ethereal, like someone bottled a soap bubble and turned it into a manicure. There’s no accent nail or detail needed because the chrome effect is the entire event.

Photo credit: @nailartist
Chrome powder application is the key here, and it’s more accessible than it looks. Start with a gel base in a milky lavender or soft periwinkle — The GelBottle Inc.’s “BIAB Lavender” or Beetles’ pastel purple range works well — cure it, then rub a holographic or unicorn chrome powder over the tacky layer using a silicone applicator or your fingertip until the surface turns mirror-smooth. Seal with a no-wipe top coat, cure, and you’re done. As highlighted in Vogue’s coverage of the chrome nail trend, the secret to a truly reflective chrome finish is ensuring the base color is completely smooth before powder application — any bumps or texture will break the mirror effect.
Dreamy, futuristic, and effortlessly cool. This set looks incredible in sunlight, in photos, and under salon lights, and it’s one of those manicures that makes every simple hand gesture feel cinematic. For anyone exploring August nails ideas 2026 with an iridescent or chrome finish, these periwinkle almonds are the gold standard.
Classic French Tips with a 3D Pink Flower Accent
The French manicure doesn’t need reinventing — it just needs a single, perfect detail to make it feel current. This set demonstrates that philosophy flawlessly, with short, softly squared nails in a classic pink-and-white French tip configuration, the smile lines clean and natural, the nude base warm and healthy-looking. The standout moment is one accent nail featuring a sculpted 3D pink flower with delicate, slightly curled petals and a tiny gold bead at the center. It’s restrained, feminine, and impossibly chic.
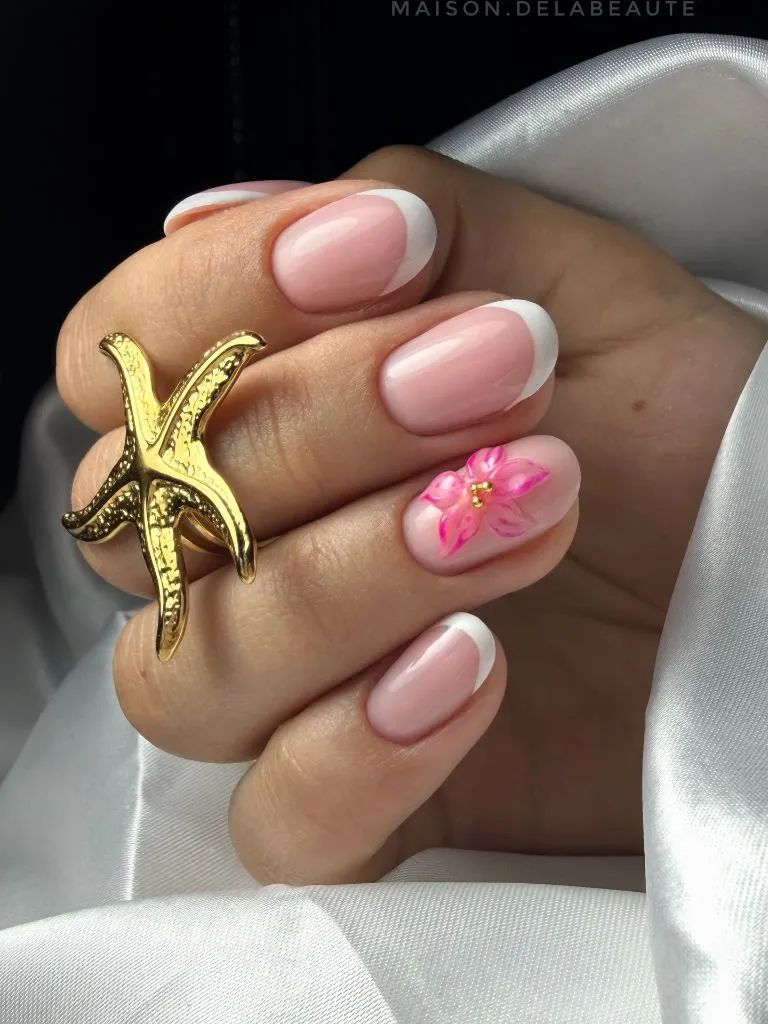
Photo credit: @maison.delabeaute
The French tips are best applied with a thin striping brush using a bright white gel — CND Shellac and OPI GelColor both offer crisp, true whites that don’t streak. For the 3D flower, you’ll need a sculpting gel or builder gel; work small amounts at a time, shaping each petal individually with a damp brush, curing between petals so nothing shifts or collapses. The gold center bead can be a tiny nail stud from Daily Charme or a dot of gold chrome gel. What I love about this design is its restraint — one dimensional accent on an otherwise classic set creates more impact than covering every nail in embellishments. This is exactly the kind of elevated simplicity that nail artists like Deborah Lippmann champion.
If someone asked me for a manicure that works literally everywhere — weddings, job interviews, vacation dinners, everyday errands — I’d point them here. It’s timeless with a twist, and the short nail length makes it especially practical and long-lasting. This is an August nails idea for 2026 that proves elegance doesn’t require length, complexity, or drama.
Green-on-Green Retro Flower Power Almonds
Retro, playful, and completely committed to its color story — this green floral set is pure joy. The almond-shaped nails alternate between two complementary greens: one hand features a bright grass-green base with lighter mint-green daisies, while the other reverses the combination with a pastel mint base covered in deeper emerald-green flowers. Each daisy is simple — five rounded petals and a contrasting center dot — giving the whole set a 1960s flower-power vibe that feels both nostalgic and refreshingly modern.
Photo credit: @nailartist
The two-green approach keeps this monochromatic but visually interesting. I’d use a bright, creamy green like OPI’s “Rated Pea-G” or a similar shade from Luxa Polish for the deeper tone, paired with a soft pastel mint from Beetles or Born Pretty for the lighter base. The flowers themselves are easiest to create with a dotting tool — press five dots in a circle for the petals, add a contrasting center dot, and you’re done. No liner brush required, which makes this genuinely DIY-friendly even for beginners. Thin, even base coats are essential since green shades can be notoriously streaky, so I’d recommend three thin coats rather than two thick ones for that perfectly smooth canvas.
This set is for the woman who sees her nails as an extension of her personality — fun, unapologetic, and a little bit vintage. It’s the perfect manicure for weekend markets, iced matcha runs, and any August day where you want your nails to make you happy every time you glance down. Among all the solid summer nails and patterned sets I’ve seen, this one strikes the most joyful balance.
Coastal Blue Line-Art Nails with Seashell and Starfish Sketches
If minimalism and the ocean had a baby, it would look exactly like this manicure. These short, rounded nails start with a milky white or soft translucent base, overlaid with the softest whisper of baby-blue vertical stripes on alternating nails. The true magic lives in the delicate blue line-art illustrations scattered across the set — a conch shell here, a starfish there, a sea turtle, a tropical flower, a sand dollar — each one drawn in a single fine blue line like a pen-and-ink sketch from a seaside journal. The result is coastal and whimsical without being childish, and the restrained color palette of cream, white, and cornflower blue keeps everything feeling polished.
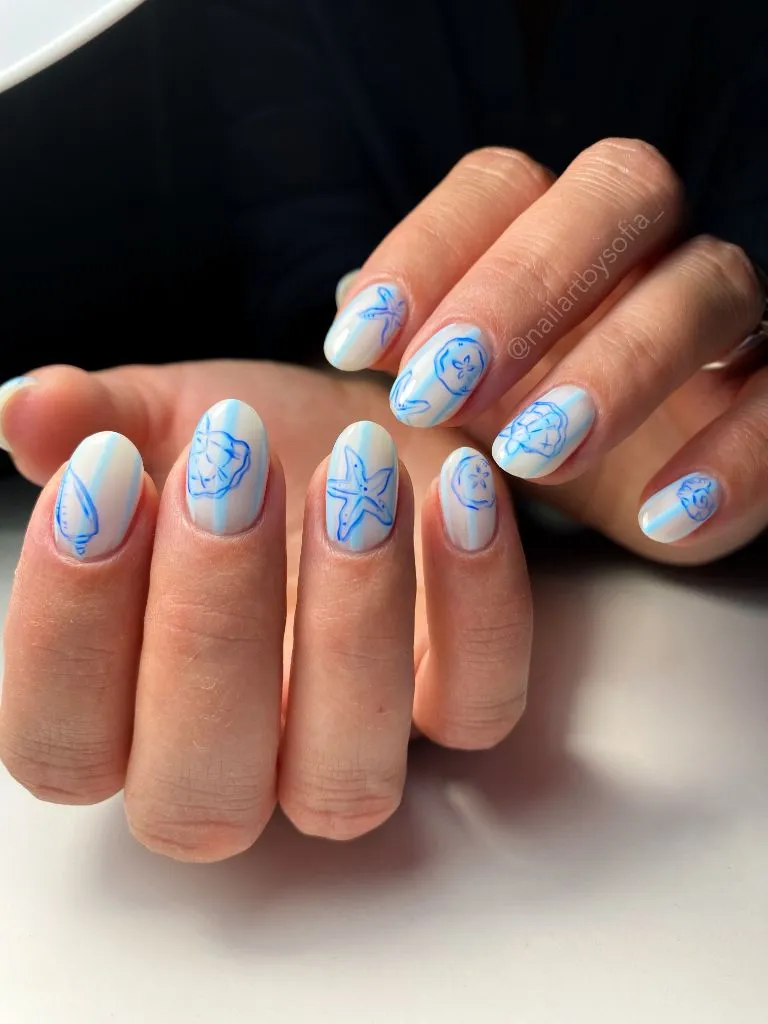
Photo credit: @nailartbysofia_
A milky or sheer white jelly gel creates the perfect base — something from The GelBottle Inc. or CND’s sheer range would work beautifully. The blue stripes are applied with striping tape for clean, parallel lines, then removed before curing. For the line-art illustrations, you’ll need a very fine liner brush (size 0 or 00) and a blue liner gel; practice the motifs on a nail wheel first, drawing each figure in single, flowing strokes. I’ve found that slightly watering down the gel with a drop of cleanser can make the brush glide more smoothly for this kind of illustrative work. The beauty of this design is that slightly imperfect, hand-drawn lines actually look better — they add to the artisanal, sketchbook charm.
Beachy, elegant, and quietly artistic. This is the ideal manicure for a coastal vacation, a weekend at the lake, or anyone who wants their August nails ideas 2026 to carry a little bit of the ocean with them. It works beautifully on short natural nails and would also make a stunning pedicure option.
Deep Burgundy Glossy Squares — Rich, Quiet, and Undeniably Chic
Whenever the calendar creeps past mid-August, I find myself reaching for deeper, wine-adjacent shades that feel like the first whisper of autumn. This set leans fully into that instinct with short, neat square nails painted in a deep burgundy — somewhere between black cherry and oxblood — with a high-gloss, almost mirror-like finish that gives the dark shade a luxurious depth. There are no accents, no art, no distractions. Just a rich, moody color applied immaculately on a clean, classic shape.
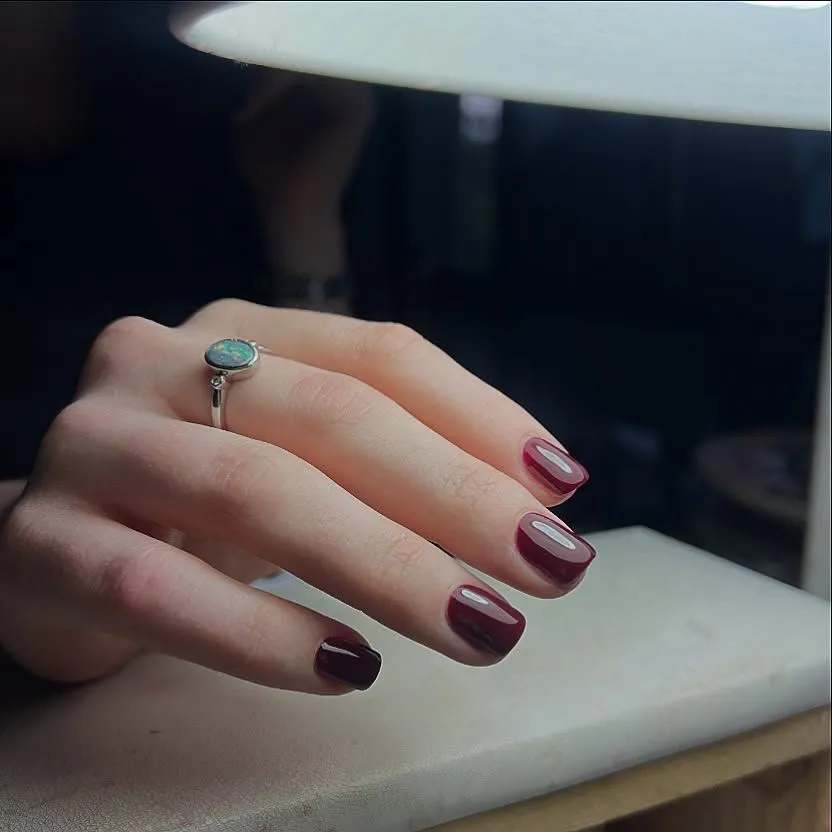
Photo credit: @nailartist
The shade reminds me of CND Shellac’s “Dark Dahlia” or OPI’s “Malaga Wine” — those iconic, slightly vampy reds that look expensive the second they hit the nail. Two even coats over a smoothing base coat, cured carefully, then sealed with a super-glossy top coat is all you need. The key to making dark colors look flawless rather than muddy is capping the free edge of each nail with every coat — base, color, and top — to prevent tip wear and chipping. Short square nails are actually ideal for deep shades because the compact, clean shape keeps the look sophisticated rather than gothic.
This is a mood. It’s for the woman who starts mentally transitioning into fall the moment August begins, who prefers her beauty choices understated but impactful, and who knows that a dark manicure with perfect application needs absolutely nothing else. If your August nails ideas 2026 lean moody rather than sunny, this burgundy set is pure, quiet power.
Emerald Green and Lilac Nails with Tiny Pink Flower Details
Garden-inspired and effortlessly pretty, this set mixes rich emerald green with soft lilac pink in a way that feels like a bouquet you’d pick up at the end of summer. The short, natural-length nails alternate between glossy emerald green — deep, saturated, almost jewel-toned — and a creamy lilac-pink, with the green nails adorned with tiny hand-painted pink flowers that look like miniature cherry blossoms. Each flower is just a few soft pink dots clustered together with a lighter center, simple enough to feel delicate rather than busy.
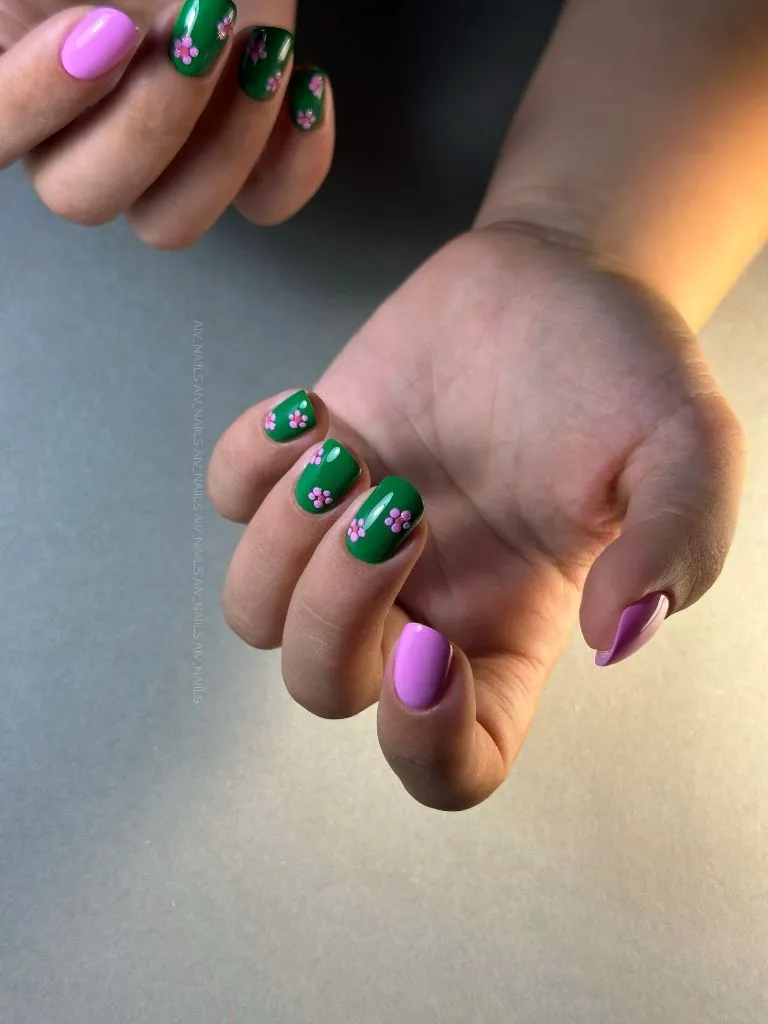
Photo credit: @avv.nails
The emerald shade needs to be truly rich — I’d look at DND’s “Lucky Green” or a similar deep green from The GelBottle Inc., applied in three thin coats for a perfectly opaque, streak-free finish. The lilac accent nails call for a soft, slightly warm pink-purple like Beetles’ “Lavender Love” or a shade from Luxa Polish’s pastel collection. For the flowers, a small dotting tool and a baby-pink gel are all you need — press three to five dots close together, add a tiny white or lighter pink dot at the center, and cure. These micro-florals look deceptively professional but take only seconds per nail once you have the technique down.
Fresh, feminine, and just a little bit unexpected — the green-and-lilac combination isn’t one you see often, which makes it all the more charming. This is a lovely choice for anyone who appreciates cute, August nails ideas 2026 that feel garden-party-ready and work just as well on very short nails. It would also look gorgeous as a pedicure with the emerald on the big toes.
Sage Green and Tortoiseshell French Tips with Pink Argyle Accents
Preppy meets earthy in this unexpectedly harmonious mixed manicure. The almond-shaped nails feature a sheer pink or nude base throughout, with different accent designs rotating across the set: some nails wear deep tortoiseshell-brown French tips that feel autumnal and warm, others showcase a solid sage-green nail with a white accent line and tiny gold studs, and the remaining nails display a soft pink-and-white argyle pattern that adds a collegiate, prep-school charm. The palette — sage, tortoiseshell amber, blush pink, cream — is beautifully curated, like a perfectly packed suitcase for a late-summer trip to the countryside.
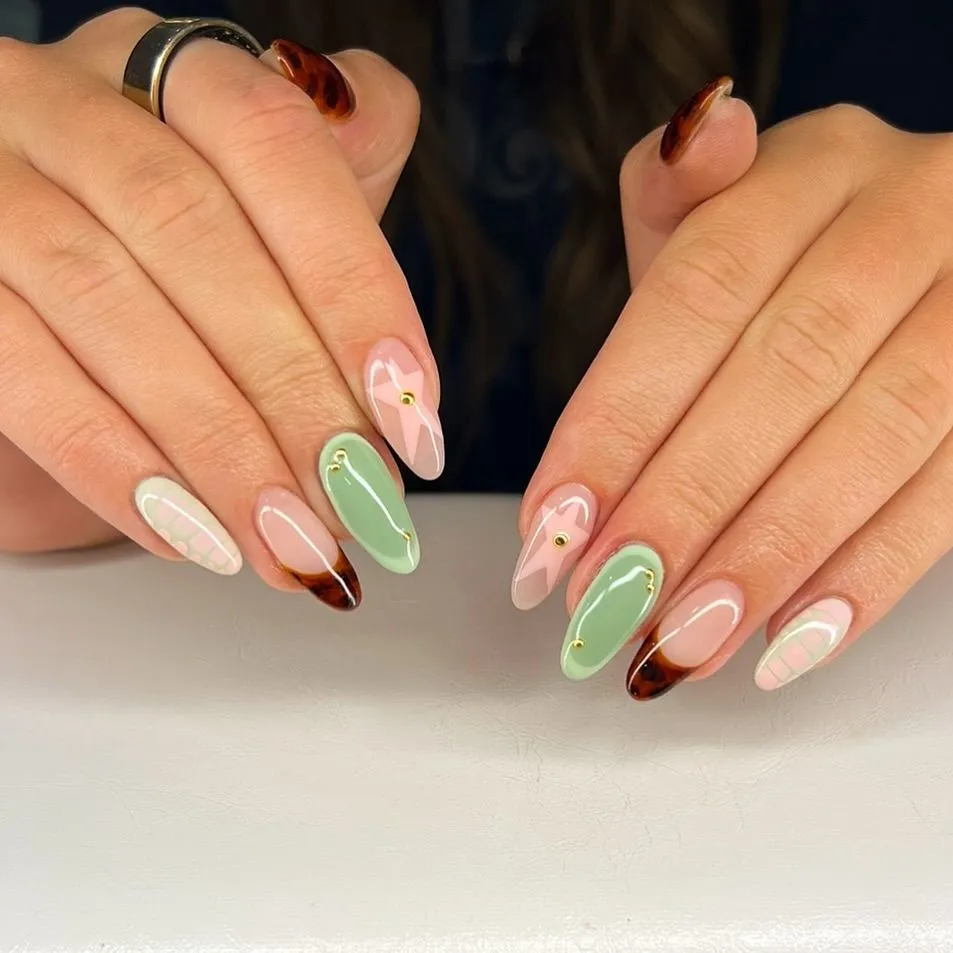
Photo credit: @nailartist
The tortoiseshell tips use the same blooming-gel technique I described earlier — amber base with espresso drops, outlined in fine gold once cured. The sage-green nails call for a muted, grey-green gel (The GelBottle Inc. makes incredible sage tones) with a thin white line traced down the center using a striping brush and small gold studs pressed into uncured top coat. The argyle pattern is created with striping tape: apply the base pink, lay down crisscrossing tape in a diamond grid, paint the alternating sections in a slightly different pink or white, peel the tape, and cure. It’s more time-intensive than a solid color but absolutely achievable at home with patience.
This is the set for someone whose personal style leans classic with a modern twist — think oversized blazers, loafers, and a good leather bag. It bridges August and September seamlessly and suits anyone looking for August nails ideas 2026 that feel polished, interesting, and just a little bit bookish. The mixed-design approach means you could simplify it to just your favorite two elements if the full set feels like a lot.
Eclectic Autumn Mix — Tortoiseshell, Sky Blue, and Burgundy Polka Dots
Personally, I live for a mixed manicure that looks like it shouldn’t work but absolutely does. This short oval set throws together tortoiseshell nails, solid burgundy nails with sky-blue polka dots, light-blue nails with burgundy polka dots, and boldly split nails that combine blue and deep cranberry in an abstract color-block pattern. Every nail is different, yet the tight three-color palette of tortoiseshell amber, sky blue, and deep wine red creates surprising cohesion. The glossy finish across all nails ties the eclectic set together with a polished, intentional look.
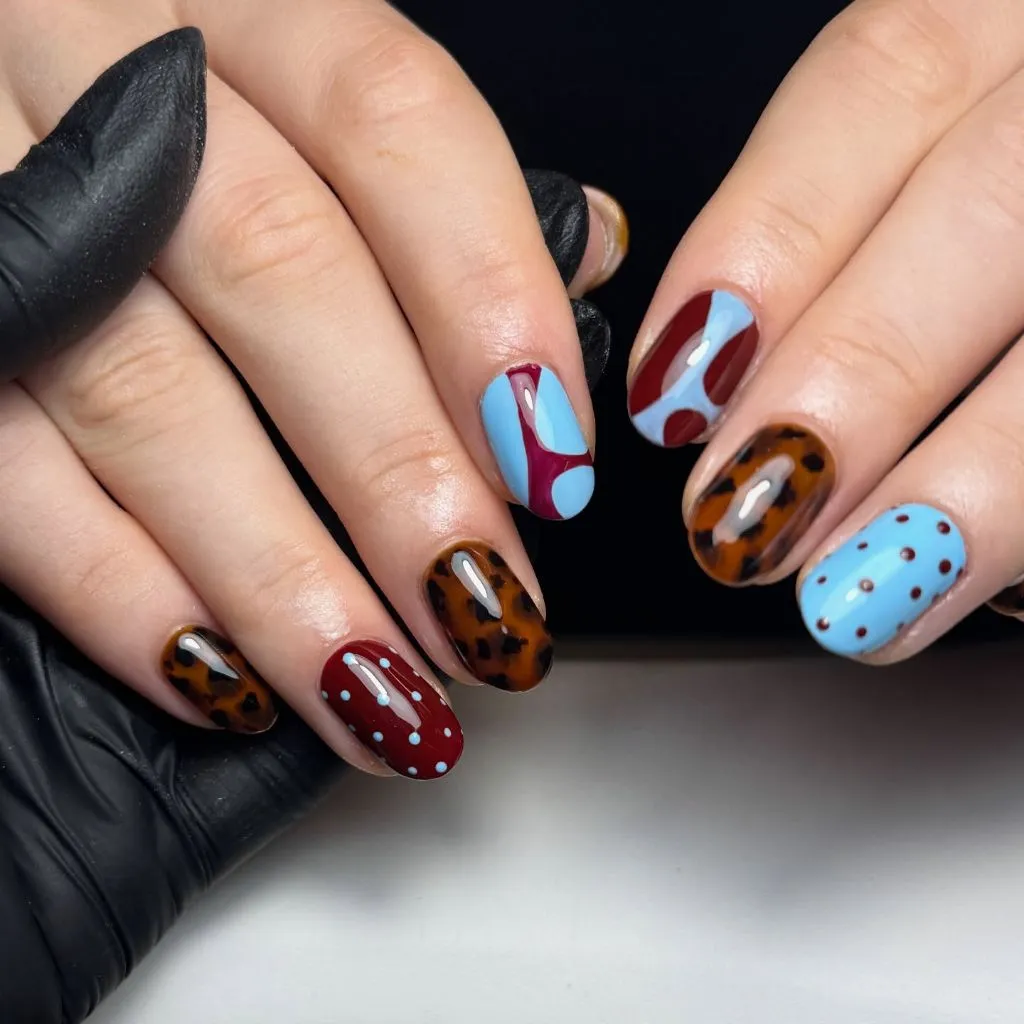
Photo credit: @nailartist
For the tortoiseshell nails, a blooming gel or hand-painting technique in amber, espresso, and brown-black works perfectly over a warm orange base. The polka dots are the simplest element — a medium dotting tool loaded with the contrasting color, pressed in an even scatter across the nail, creates a charming, slightly retro pattern in seconds. The color-block nails require a steady hand and a thin brush to divide the nail into two zones, painting each half in its respective shade and cleaning the dividing line with a cleanup brush dipped in alcohol. I’d suggest DND or Born Pretty for the tortoiseshell tones, CND for the burgundy, and Beetles or OPI for the sky blue — this set benefits from brands that offer highly pigmented creams for clean, opaque coverage.
Fearless and fun, this is the manicure for the maximalist who treats her nails like an art project. It’s perfect for late August when you’re caught between summer playfulness and fall’s richer tones and simply refuse to choose. If your search for August nails ideas 2026 keeps leading you toward the unexpected, this set will feel like home.
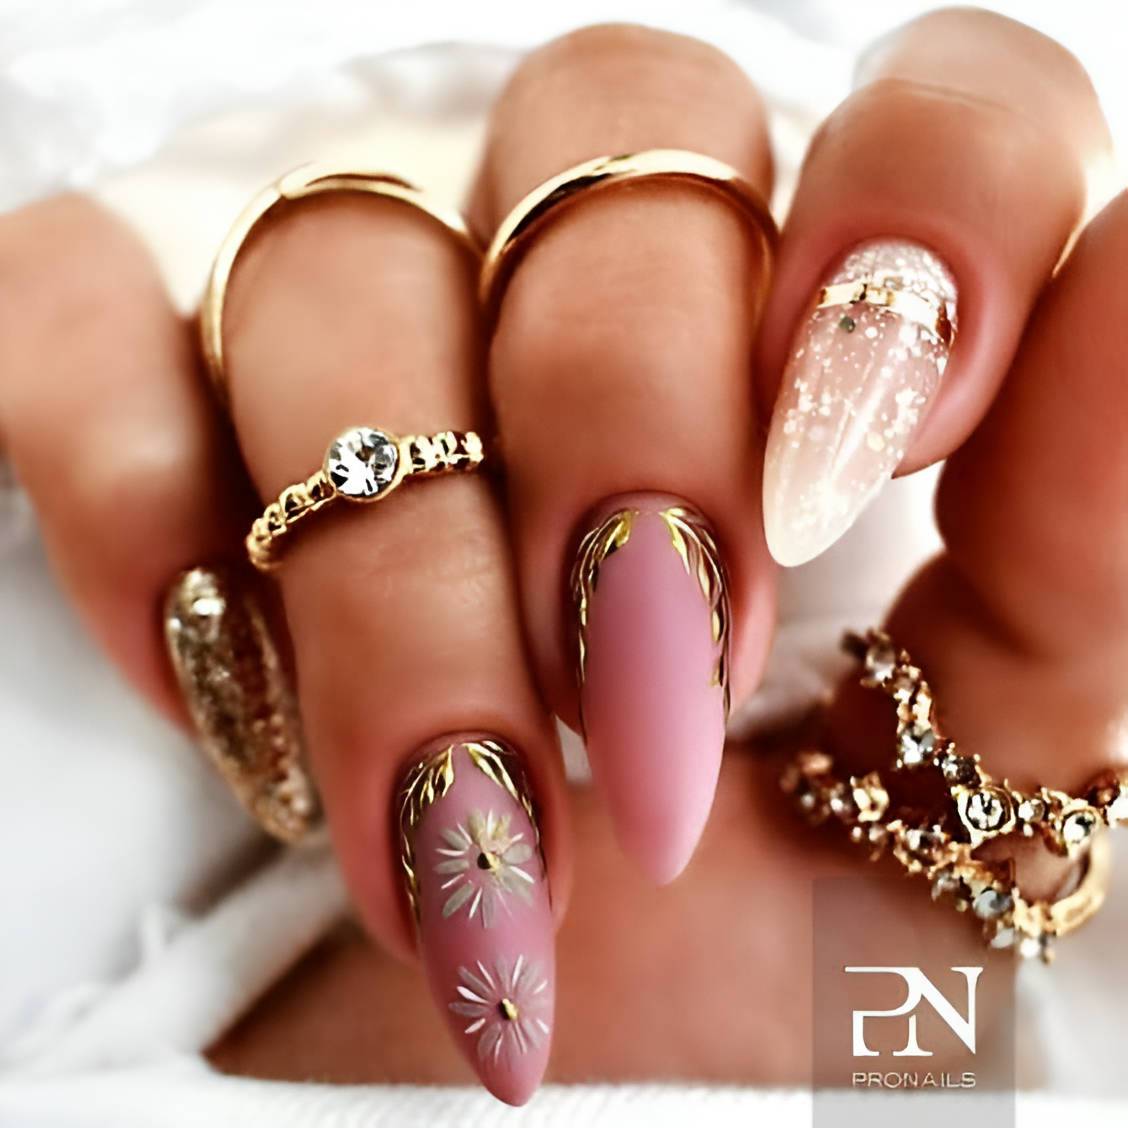
Deep Wine Almonds with Gold Star Accents and Half-Moon Detailing
Rich. Warm. Endlessly wearable. These almond-shaped nails are painted in a deep wine-red — darker than cranberry, lighter than true burgundy, with that gorgeous depth that only certain reds achieve — with a high-gloss finish that makes them look almost lacquered. The accent nails introduce a half-moon or diagonal cutaway design where the sheer pink natural nail is left exposed at the base or side, and tiny gold starburst accents sit at the intersection of color and bare nail, catching light like small, deliberate constellations. The combination of the deep, sultry red with those delicate celestial gold details is the kind of contrast that feels both moody and romantic.

Photo credit: @nailartist
I’d look at OPI’s “We the Female” or CND Shellac’s “Crimson Sash” for that precise wine shade — something that reads burgundy-red in low light but reveals warm ruby undertones in sun. The half-moon design is carved out with a small cleanup brush dipped in alcohol before the final cure, or by using a curved sticker as a guide before painting the color. The gold star accents can be tiny nail charms from Daily Charme or hand-stamped with a star stamping plate and gold chrome polish. I’ve found that placing the starburst exactly where the color meets the negative space creates the most visually impactful focal point — it draws the eye naturally to the design element.
This is the manicure I’d wear to a late-August evening event without a second thought. It has the drama of a dark red nail with the sophistication of thoughtful design details, and it transitions perfectly into fall without needing any changes. For anyone whose August nails ideas 2026 lean romantic and luxurious, this wine-and-gold combination is the definition of elegant nail art.